yong tau foo (stuffed tofu and vegetables)

While my mom was here in DC helping us with our new baby, my dad was left to fend for himself at home. When it comes to eating, though, no one need feel too sorry for him. My mom even offered to cook and freeze him a bunch of meals for the time she’d be away, but he actually shuddered at the thought and pleaded with her not to. You see, my dad hates eating “leftovers” (yes, technically, meals made just for him and then frozen are not really leftovers, but, well, to my dad, anything less than freshly cooked and still steaming hot from the stove is considered a leftover). He also likes to make things on a whim according to whatever strikes his mood at the time, so having a freezer full of food he didn’t make himself is just not his style. Plus — and this is where it gets a bit contentious — he secretly (or not so secretly) thinks that my mom takes shortcuts in her cooking, which means her food is just not up to his standards.

So while my mom was here cooking up bun rieu and bo kho for us, what was my dad making for himself at home? Fried eggs? Easy stir-fries or one-pot meals? No, I tell you, the man was wrapping his own dumplings and wontons. We called him one evening, and he told us he was making these stuffed vegetables I’m about to share with you. There are no boring meals when eating with my dad.

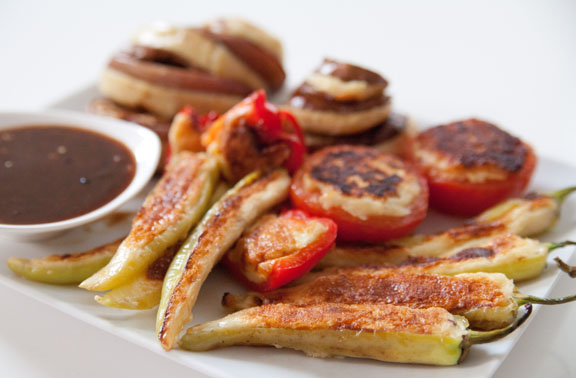
These stuffed vegetables are something my family made often while I was growing up, and I was glad to find them at the markets when I visited Vietnam, Malaysia, and Singapore. Yong tau foo (which means “stuffed tofu”) is traditionally a Hakka dish and originally involved stuffing tofu with ground pork. These days, you’re more likely to see the dish as tofu and vegetables stuffed with fish paste, and it is really popular in Malaysia and Singapore. In our home, we actually called it yeung yeh, which means “stuffed stuff.” :)

Yong Tau Foo (Stuffed Tofu and Vegetables)
Serves 2 as a main dish accompanied with rice, or 4 as part of a larger meal.

You can stuff practically any kind of vegetable you’re able create an opening in. My family’s favorites include eggplant, chili peppers, bitter melon, tomatoes, and long beans that my mom weaves into small wreaths. In Malaysia, I found that tofu puffs and okra (called lady fingers) are also very popular.

Although it is possible to make your own fish paste, after helping my mom make it once, I have to admit it can easily double or triple the time it already takes to make this dish. And it is tricky to get the paste to come out to a smooth consistency. So most of the time, we just get store-bought fish paste and add some extra seasonings and oil to make it smoother and less dense. My mom also adds an egg for richer flavor, and recently she has taken to beating the egg white separately until foamy, before adding it to the fish paste for an even smoother and lighter texture.

Traditionally these stuffed tofu and veggies are served in a broth, but nowadays you’ll see it with sauce more often than not, either on the side or cooked with the vegetables. 

Vegetables (suggestions):
1/2 red bell pepper, deseeded and cut into four square pieces
4 long banana peppers, sliced in half, with the seeds and ribs taken out
1 tomato, cut in half and deseeded
1 long Chinese eggplant, cut diagonally into 1-inch pieces and then butterflied (sliced lengthwise almost all the way to the other edge); you can also optionally peel off strips of the skin so you don’t taste as much of the chewy skin, as well as for a pretty striped look
corn starch for dusting

Fish Paste:
1 12-oz container fish paste
1/4 tsp ground pepper (white pepper is preferable for appearance, but otherwise black is fine)
1/2 tsp chicken bouillon powder
2 Tbsp vegetable oil
1 tsp sesame oil
1 egg, separated
vegetable oil for pan-frying

Sauce:
1 Tbsp vegetable oil
2 cloves garlic, chopped
1 Tbsp fermented black bean paste
1 Tbsp oyster sauce
1 tsp sugar
3/4 cup chicken stock
1 tsp cornstarch
2 Tbsp water

1. Prepare the vegetables (and tofu if you’re using) by washing, cutting, and making any necessary holes or incisions. If you use long beans, you can create a wreath by tying a loose knot on one end and then winding the long leftover end around the loop until you run out of space; you can then stuff the wreath by filling the hole with fish paste.

2. Dust the vegetables with a bit of cornstarch where you plan to stuff them. This will help the fish paste adhere better and not come apart while cooking.

3. Prepare the fish paste by mixing it in a bowl with the ground pepper, chicken bouillon powder, vegetable oil, sesame oil, and egg yolk. Mix in one direction for best results. The paste will separate when the oils are added, but keep mixing to distribute the oil, and the paste will come back together. For a lighter mixture, beat the egg white in a separate bowl until frothy, then mix it in together with the fish paste mixture. (If you don’t have time, this step can be skipped, and the whole egg simply mixed into the fish paste at once.)

4. Stuff the vegetables with the fish paste mixture.

5. Heat a frying pan on medium-high heat. Add 1-2 Tbsp of vegetable oil. When the oil is hot, pan-fry the stuffed vegetables in the pan in batches. Avoid overcrowding. Let the stuffed vegetables brown for about 3 minutes on one side, then cover the pan and let them finish cooking. Depending on the vegetables, this may take another 3-5 more minutes. Lift the cover and turn the vegetables over to the other side to finish cooking and browning. Repeat with each batch until all the stuffed vegetables are cooked. Set the vegetables aside.

6. In the same frying pan, heat 1 Tbsp of vegetable oil. Add the chopped garlic. Once the garlic turns golden, add the fermented black bean paste, oyster sauce, sugar, and chicken stock. Mix and let the sauce come to a simmer. In a small bowl, mix the cornstarch with cold water until dissolved. Stir the cornstarch mixture into the sauce in the pan. You can serve the stuffed vegetables in the sauce or serve the sauce on the side.

cooking in grenada

Hello from the sunny island of Grenada (pronounced gruh-nay-duh)! Grenada is a tropical island located in the West Indies, just north of South America. This will be our home for the next two years while Dean is studying, so I just wanted to introduce you to this beautiful island, as well as share about how I’ve been getting along with all the new foods and different cooking styles here.

First off, we’ve found that the food here is generally much more expensive than in the US, especially if you’re going to buy American/imported products. Because we’re both pretty adventurous when it comes to trying to new foods, and because we’re trying to keep costs low, we’ve decided that we’ll be buying mostly locally grown and raised products. We’ve made a few exceptions for things like peanut butter, milk, cheese, and occasional treats, but for the most part, we’re trying to immerse ourselves in the culture and foods of this new place.

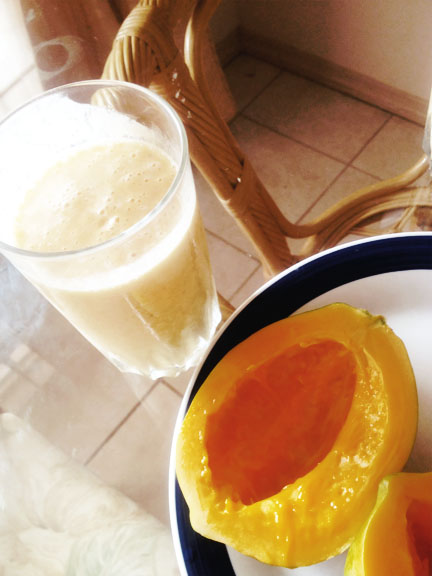
Grenada is bountiful, with tons of different tropical fruits – mangoes, papayas, bananas, starfruit, soursop, citrus, and lots of varieties of new, indigenous fruits. We’ve tried to sample a few different ones: golden apples, cashew fruits, sapodillas, but haven’t taken a liking to any of them yet. The fruits that we’ve found most available and inexpensive have been the mangoes, bananas, and papayas.

I expected there to be a lot of fresh fruit here, so I actually brought my Magic Bullet with us to make smoothies! I’m so glad we did. :) There are several smoothie vendors around Grenada, but I’ve found their prices to be almost like Jamba Juice back home (about $4)!

We ventured out to the fish market in town last weekend to pick up some fresh fish. In Grenada, it seems that all the vendors sell the same exact things at exactly the same prices, so there isn’t a lot of competition or bargaining to be had. We picked up this “red fish” for about $3/lb and then had it washed and cleaned for about $1 in the back of the market (with a machete, I might add. Did I mention they use a machete for everything here?). I ended up steaming the fish Asian-style, but I was disappointed with how chewy the meat and skin were. My mom suggested that I could try a less delicate cooking method for the fish, such as stir-frying, stewing, or simmering in soup.

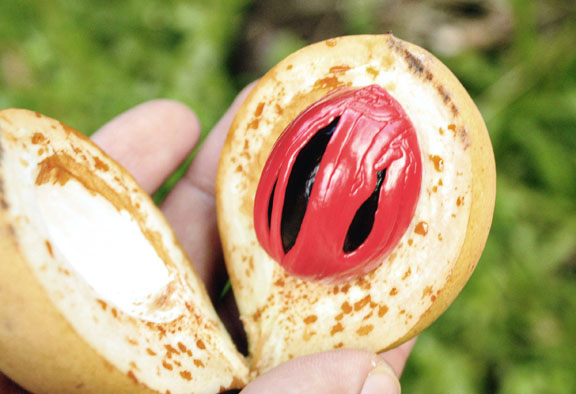
It’s been hard to find all the same types of ingredients that I’m used to cooking with back home, but one thing that I can find in abundance here is spices! Grenada is often called the Isle of Spice because they grow and produce so many of the spices that we find at home. In particular, nutmeg is Grenada’s number one export. They use the fruit on the outside for jams and jellies, the red skin of the pit for cosmetics and dyes, and the inside for spice.

I’ve been experimenting with lots of new recipes that I hope to share with you soon, using some of the available ingredients here like pumpkin, local goat, and salted pork! [Update: You can find a recipe for pumpkin soup with salted pork here.]

P.S. We weren’t sure how available Asian food would be here, particularly Vietnamese food, so we brought a little stash with us (rice paper, rice noodles, Shin Ramyun, plus other assorted instant noodles). We also brought along some condiments too. :D  Turns out, there are a few Chinese restaurants, and we have been able to find things like soy sauce and sesame oil, but there is only one brand: Roland. Has anybody ever heard of it? It just seems weird to me that Roland makes soy sauce and saltine crackers.


cooking at home, part 4: my favorite appliances

My last post in this series is devoted to some of my favorite kitchen appliances…

The freezer. I get rather embarrassed when a friend comes over and wants to stick, say, a pint-size tub of ice cream in my freezer, and I don’t really have space for it. I’m afraid I look like quite a hoarder if you peek in my freezer! When I’m good about it, I try to keep a rough inventory of what’s in my freezer, to make sure I don’t neglect something that’s stored way back in the corner.

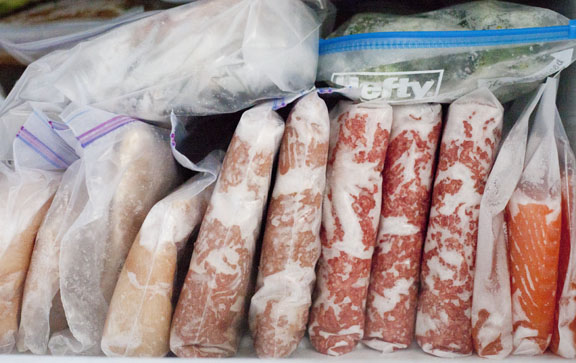
Growing up, my parents always had a separate deep freezer at home, even when we lived in a small apartment. That’s because they always stocked up on sale items, hard-to-find ingredients (like Asian ingredients when you’re living in, say, Saskatchewan), and meals prepared in advance. I’m lucky to have space for a normal-size fridge at all, let alone a deep freezer, so I try to make use of every square inch of the freezer I do have. My sister likes to make fun of the way I organize my freezer like a bookshelf ’cause I like to freeze things flat in quart-size Ziplock bags and stand them up for easier access. :)

A peek inside my freezer, organized "like a bookshelf" according to my sister.

I freeze everything from pre-made meals, to homemade stock, to chicken carcasses (for making more stock), to shredded cheese (bought in bulk during sales). I also like to use the ice cube tray for freezing ingredients you might need in smaller amounts in certain recipes (like tomato paste or stock for sauces). After the cubes are frozen, I take them out and store them in Ziplock bags. My sister’s in-laws have a lemon tree, and they like to freeze lemon juice in the ice cube trays for months when lemons are out of season.

The rice cooker. When I went abroad to France for nine months during college, I actually made room in my two allowed pieces of luggage for, that’s right, my rice cooker. I blame it on my parents. When I was growing up, they often brought a rice cooker on family vacations. We cooked meals in motels, with the rice cooker sitting next to the sink and plugged into the outlet meant for blow dryers. How Asian of us, right? :)

My first rice cooker was a cheap, simple model (and I actually left it behind in France so I could make room for all the souvenirs I was bringing back), and it was the same one I used when I lived in the dorm my freshman year of college (particularly useful there because hot plates were not allowed in American dorms… unlike in French dorms). I cooked so much more than rice in that thing. I made instant noodles. I steamed and boiled veggies. I even tried to stir-fry in there (ok, that didn’t work too great). I also made congee in it by leaving the lid off (it was a one-function rice cooker that was not meant to make congee like the fancy ones these days). You can basically make anything in there that you’d normally boil water for. Many of my dorm meals consisted of rice plus veggies and marinated meat, which all cooked in the steam created in the rice cooker. I didn’t even use the steamer insert — I just threw it all in there and let it cook together.

Nowadays, I don’t make use of my rice cooker nearly enough. The fancy Zojirushi model I have now takes a while to cook rice, so I end up making a big batch of rice all at once on the weekends. The rest of the time, my rice cooker, sadly, sits in my cupboard. What I do use every day and reserve valuable kitchen counter real estate for is…

The toaster oven. You can make anything in the toaster oven you would make in a real oven, just in smaller portions. But this makes it perfect for daily use. I’ve had my convection Euro-Pro toaster oven since grad school, and even though it’s almost died on me several times, I’m still holding onto it because I haven’t been able to find a good-size model like this available anymore — big enough to hold more than two slices of bread, but not giant and boxy the way they make them to bake pizzas these days. I make room in my teeny tiny kitchen for this one appliance because I use it every day. I bake eggs or make toast in it for breakfast and roast veggies and meats in it for dinner. I’ve even roasted a whole chicken in it many a time. Given that my actual oven is miniature in size, used to store pots, and is really temperamental temperature-wise, my toaster oven is indispensable in my day-to-day cooking. Chef Eric Ripert even has a video series called Get Toasted that’s dedicated to this little appliance.

What appliances do you use every day at home? If you were going abroad for a year, what kitchen tools would you bring with you or invest in during your temporary stay?

This post concludes my Cooking at Home series this week, but I’m always on the lookout for ways to make my weekly meal preparation go more smoothly, so feel free to send tips my way any time. :)

cooking at home, part 3: meal preparation

After all that meal planning and grocery shopping, the real fun begins…

Saving time with prep work. I have a certain system I like to follow each week. Upon returning home from the grocery store, I make sure the dishwasher and sink are cleared. I go through the fridge and toss out anything that’s gone bad. I also take this opportunity to do a wipe-down of the fridge if it needs it. I then wash and chop most of my produce, storing things in containers or in Ziplock bags lined with a paper towel to soak up some of the moisture. If necessary, after washing and spinning, I’ll lay greens out on kitchen towels to dry before storing, as the moisture makes them go bad more quickly. I often keep containers of chopped scallions, fried shallots, chopped onion, and other often-used ingredients ready in order to speed up cooking later on. For example, it’s easy to cook up a quick omelette in the morning by grabbing the pre-chopped onion and scallions and tossing in some prewashed spinach leaves.

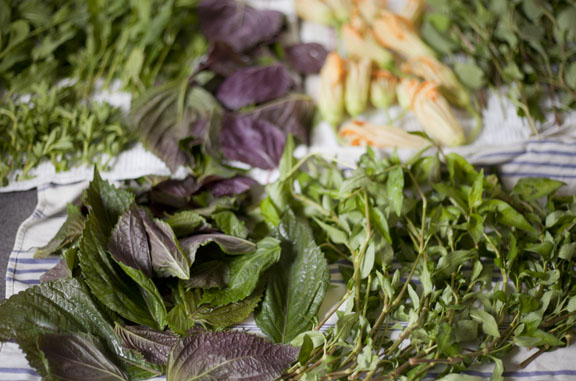
Viet herbs and squash blossoms, washed and spun, now laid out to dry on kitchen towels; ready for Vietnamese wraps, noodle bowls, and soups later in the week.

Batch cooking. If it weren’t for the cleanup that ensues (and, oh, all the other non-food-related work I have to do), I could easily and happily spend every moment of the day cooking. What actually happens, though, is that I have one or two cooking sessions each week — a more involved one on the weekend and a less involved one about mid-week. On an average weeknight, I’m either repurposing leftovers, reheating a pre-made meal, or using ingredients prepped ahead of time to cook up a quick dish or two. One of the greatest advantages of batch cooking, I find, is that it not only makes cooking more efficient — it also makes cleanup more efficient.

While I’m doing prep work on the weekend, I cook up large batches of certain things for the week, like oatmeal, rice, and steamed veggies. I know my sister likes to boil a bunch of eggs to throw into salads or have for breakfast. I also like to make a jar of vinaigrette for the week’s salads.

In addition to cooking several meals at once, I also increase the portions. Whenever I make a dish, I usually make enough of it to last at least two meals. I find that four meals is my limit for eating the same thing (and it has to be something I enjoy in the first place), and it’s helpful if those aren’t all in a row too. An easy rhythm to get into is to always double your dinner portions, so that you can bring the leftovers for lunch the next day. This doesn’t work so well with things like fish (and other smelly items), in which case it’s helpful to have some alternative ready-made meals to bring instead. For things that freeze well, I’ll quadruple the portions, saving enough for two meals now and freezing two meals for the future.

One of my husband's packed lunches this week, made up of leftovers -- brown rice, steamed broccoli, poached chicken, and ginger scallion dipping sauce.

Repurposing ingredients and leftovers. I try to plan for dishes with overlapping ingredients in the same week. For example, if I’m getting cilantro and lime for some Vietnamese dishes this week, I’ll also work in some Mexican dishes, where those ingredients are prominent as well. I also mentioned earlier this week how I like to plan my menu around base meals and leave room for variation. We often use our poached chicken later in the week for noodle soups, salads, or chicken enchiladas. Meats are always easy to repurpose into things like wraps, sandwiches, and to add to salads and soups. Certain veggies can work this way too, like spinach or mushrooms, which often act as meat replacements in vegetarian dishes.

Do you cook every day? Do you have a process to make weeknight dinners more effficient? How do you handle breakfast and lunch?