
When we first arrived in Grenada, I was disappointed with the lack of fresh seafood available on the island. It seemed strange to me that on an island surrounded by water that is only 131 square miles large, one would have to travel all the way into town to have access to fresh seafood. Even then, you have to go early in the morning, and the selection is spotty. The few times I’ve gone, there have only been 1-2 kinds of fish available. Where was the shrimp, the clams, the conch, and the lobster?? Conch, or “lambie” (pronounced lam-bee”), is found frozen in most grocery stores here, and since it is local, is relatively inexpensive. Shrimp, on the other hand, I’ve only seen as frozen imports at ridiculously high prices.
Now let’s talk about the lobster. I’ve had lobster once here — at Fish Friday in Gouyave, where I paid a hefty 50EC ($20 US) for a grilled half lobster. And that’s a bargain for cooked lobster here. At the nicer restaurants, restaurants where you’d find lobster, they can charge anywhere between 100-120EC (about $40-50). This seems pretty pricey to me, especially since all the lobster is locally fished. I was determined to find my own lobster monger from whom I could buy fresh lobsters to cook at home.
We pass by the sign below every day on the way to school. I’ve long wanted to stop here and take a look at the seafood selection, and last week we finally had a chance. We found out that they did, indeed, sell lobster! They also sell snapper, conch, and various other fish. Below are the two beauties we took home.

We had our choice from all these lobsters you see here. The owner dumped the bag of lobsters on the ground, and they were all still squirming and moving around. (That big grey guy in the bucket is a snapper!) We ended up choosing the two smallest lobsters, which still weighed about 4 lbs together.

Now these lobsters aren’t like the kind you’d eat in America. They’re called spiny lobster, and they actually don’t even have claws. Instead, they have these giant antennae on their heads, and their bodies are covered in spikes. It makes handling them a little scary.


Pretty ugly, huh? It’s no wonder they’re called the cockroaches of the sea.
We decided to get two lobsters so that we’d have enough lobster goodness to last us a few meals, but you only need one lobster if you’re only planning on making the butter-poached lobster pasta with roe sauce. We ended up making butter-poached lobster and lobster carpaccio with the tail meat; lobster-roe sauce with half the roe; lobster risotto with the other half of the roe and meat from the body, antennae, and legs; lobster bisque with the shells; and tomalley garlic bread with the tomalley. Mind you, we didn’t eat it all at once. :)


Here are the recipes for the butter-poached lobster with roe sauce and the tomalley garlic bread.
Butter-poached Lobster with Lobster-Roe Sauce
adapted from various sources
Serves 2
1/2 pound linguine
1 female lobster (1-2 lbs)
1 Tbsp. water
1Â cup butter
1 tsp tomato paste
1 cup heavy cream
1 tsp fish sauce
salt to taste
1. In a large pot big enough to hold your lobster, bring 3 quarts of water to a boil.
2. Put your lobster into the freezer and leave it there for about 20 minutes. This puts it into a deep sleep that makes it unaware when you take on the next step…
3. Remove your lobster from the freezer and plunge it headfirst into the boiling water for 30 seconds. This helps the meat detach more easily from the shell.
4. Remove the whole lobster and place into an ice bath.
5. When cool, scrub your lobster all over with a hard-bristled brush. You’ll really want to get all the dirt off if you’re planning to use the shells to make lobster bisque or for some other use.

6. Ok, here’s the gory part (though the guy should already be dead by this point). Grasp the lobster with the tail in one hand and the head in the other. Be sure to use thick gloves or a kitchen towel to prevent getting stabbed by the spines. Holding the head in place, twist the tail and gently detach the tail from the head. Be sure to do this over a bowl to catch all the juices.

 Look at that beautiful, succulent meat and the bright red roe in the head area. Remove the roe and set aside for the roe sauce later. Remove tomalley (green gooey stuff) from the head and set aside for the garlic bread. There is still meat inside the lobster head, which you can save for another dish. The shells and legs can also be saved for making bisque and soup.
 7. With a pair of sharp kitchen shears, snip down the middle of the tail and carefully pull the tail out of its shell. It should come out quite easily, even the tail fins.
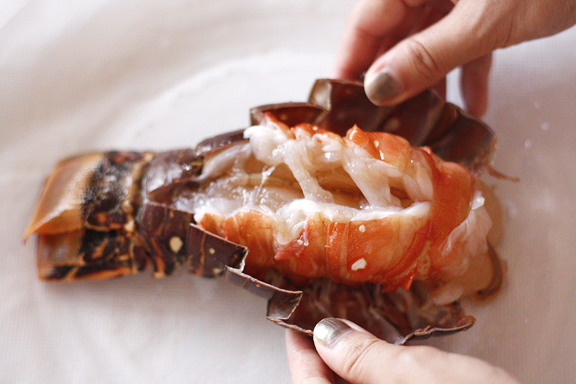
Isn’t this gorgeous?? You can see my thumbs-up in there next to the smaller lobster tail, for some scale reference. :) At this point, you can use the lobster meat for just about anything. Keep in mind the meat isn’t actually cooked yet. It’s just been briefly boiled to detach from the shell and then shocked in ice water. If you’re going to make lobster sashimi or carpaccio, I’d suggest popping the meat into the freezer for 20 minutes or so for easier slicing.

8. Cut lobster into smaller pieces for butter poaching. I used my shears and cut straight down the middle, so the tail shape stayed intact.
9. To butter poach the lobster, bring 1 Tbsp. of water to a simmer over medium heat. When the water simmers, slowly add in the butter, 1 tablespoon at a time. When all the butter has been melted and incorporated into the water, place your lobster pieces into the butter. Poach for 2 minutes on each side. While it is poaching on one side, use a spoon to ladle the hot butter over the top to help even out the cooking.
10. When cooked, remove the lobster pieces and set aside; keep warm. Turn the heat for the butter from medium to low.

11. The roe that you set aside earlier will be used for the sauce now. Gently whisk the roe until the eggs have broken up, and whisk it into the melted butter. Stir in the extra lobster juices, cream, fish sauce, tomato paste, and salt to taste.

12. Plate the pasta, top with lobster pieces. Pour sauce over the lobster and pasta. Serve hot with a side of tomalley garlic bread.

Lobster Tomalley Garlic Bread
Serves 2
We tried this without the garlic, and it tasted absolutely divine as well. In fact, I think I prefer the version without garlic because I feel like the garlic overpowers the subtle flavor of the lobster tomalley. It’s like a rich pate spread that would go great with crackers and a glass of wine.
lobster tomalley from 1 lobster
1 Tbsp. butter
1 clove garlic, minced (optional)
salt to taste
toasted bread
1. Melt butter in a small saucepan.
2. If using, add in minced garlic and saute until fragrant.
3. Add in tomalley and saute until it thickens and turns into a homogenous paste.
4. Remove from heat and add salt to taste.
5. Serve over crusty bread.

 Vietnamese Green Papaya Salad with Shrimp and Pork Belly



Connect with us