10 articles Articles posted in noodles

Ga Xe Phay, Mien Ga, Chao Ga (Vietnamese Chicken Salad, Chicken Glass Noodle Soup, Chicken Congee)

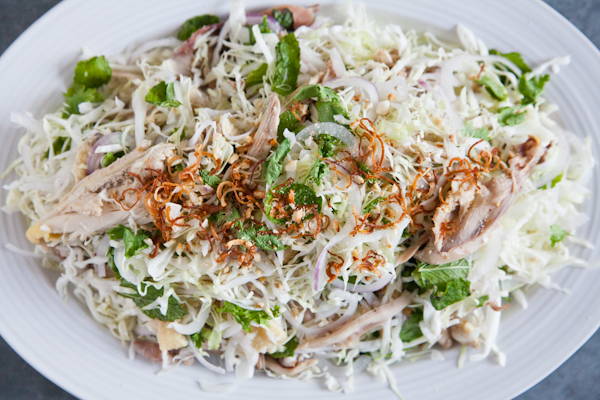
Whenever I go to Vietnam, I’m always surprised by how much better the ga xe phay (chicken salad) tastes there than in the US or when I make it at home. Last year, a dear family friend took us to a street stall near her home, where the vendor not only makes a really great ga xe phay, but also uses the chicken stock to make chicken congee and chicken noodle soup, so you get a full meal all centered around the chicken. It was so simple but so good!

In trying to pin down what made that meal so good, I’ve decided it comes down to these: (1) the cabbage is very finely shredded, so that the salad is light, not too chunky; (2) there is a generous use of Vietnamese coriander (rau ram), which lends that distinctive taste to Vietnamese chicken salad; and (3) last and perhaps most important: in Vietnam they will often include the whole chicken in the salad — bones, skin, and all.

That last tidbit is what I hadn’t really noticed before. In the US, I’m so used to chunks of skinless, boneless chicken in everything, and that’s typically how even my family makes ga xe phay at home. Not everyone likes to eat meat on the bone (my husband, for one — it’s too much work and too little payoff from his point of view), but my thought is that if you take great enjoyment in the sheer act of eating, then meat on the bone makes perfect sense. I think of gnawing on bones as savoring every last morsel for as long as possible, with the added benefit that you’re not exactly taking in extra calories in doing so. :) Nowadays it seems people can understand the idea that the bones are where the flavor’s at. The only other American equivalent I can think of is eating a drumstick, which seems to unequivocally convey the joy of eating across cultures — it’s hard to imagine a drumstick tasting quite so good without the bone, right? (As for the deboned chicken wing, I don’t think I’ll ever figure that one out.)

I’ve written about ga xe phay here before, but I just couldn’t resist doing a second post on it with this new (to me) detail. Because if you’re tucking into a chicken salad that includes all your favorite parts of the chicken… well, that makes it an entirely different type of salad. In that first post, I mentioned our family likes to make this dish for potlucks and parties, and we serve it on top of large shrimp chips. By comparison, this version here is more homey in style, because it would be a little tougher to serve, say, a chicken wing on a shrimp chip… but if you really wanted to, don’t let me stop you. :)

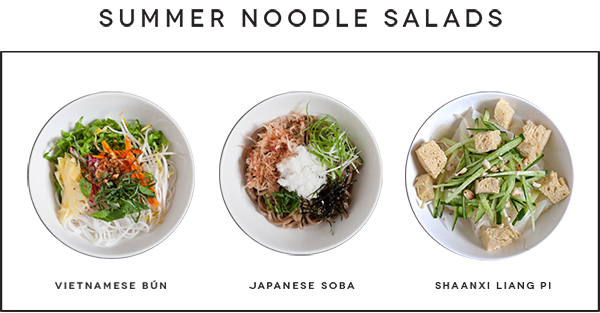
Accompanying the salad is noodle soup or congee, but instead of being the star of the meal, they are more like the starch component to round out the meal, though they are also perfectly delicious on their own. The meal is totally flexible, and at the street stall, they had a few types of noodles you could have in your soup. One of them was banh pho noodles, and you can indeed even turn the resulting chicken stock here into chicken pho simply by adding a few extra ingredients to the broth. I’ve also seen Vietnamese restaurants offer a duck version of the shredded cabbage salad to accompany bun mung vit (duck and bamboo noodle soup), so substituting duck is also a fine possibility here.

If meat on the bone is not your thing, you can simply throw those bones back into the stock after you shred the poached chicken, so that the bones can lend more flavor to the broth (or you could keep the drumsticks and wings intact but throw the rest of the carcass back into the pot). If you do choose to keep all the meat on the bone, then you’ll probably want to add an extra pound of chicken bones into the stock to get more flavor into the liquid (or, alternatively, poach the chicken in chicken stock to begin with), as I’ve noted in the recipe.

In the end, it’s really hard to say which is the best part of this meal… the salad, all my favorite bits of chicken, or the chicken-broth-infused noodles and congee. That’s why I just had to make them all here. :)

Ga Xe Phay (Vietnamese Chicken Salad)
Serves 4 as a side dish

Because the chicken forms the basis of the meal here, you definitely want to get the best chicken you can find. Organic, free-range is best. In Vietnam and much of Asia, the chickens tend to be “free-roaming” and are scrawnier, with denser meat, and more chicken flavor. The second important thing is that it’s really best to use Vietnamese coriander here, which is traditional to this dish. But if you can’t find it (as I could not in Beijing) or don’t like the flavor of it, then mint will suffice.

a 2- to 3-lb organic, free-range chicken, including organs if you like
coarse salt for scrubbing (optional)
1 tsp table salt (optional)
2 scallions, cut into 2-inch pieces
1-inch piece ginger, sliced
1 lb chicken bones (back, neck, wings, etc.) (alternatively, you can use the bones of the poached chicken after it’s shredded if you don’t intend to keep the meat on the bone; or if you don’t add any extra bones at all, you could use chicken stock instead of the water listed next)
2 quarts water, or just enough for the chicken to be submerged
1/2 head of cabbage
1 medium-size red onion
1/2 cup packed Vietnamese coriander (mint is an acceptable substitute), leaves plucked off
1/2 cup packed cilantro, torn into small pieces
fish sauce dressing (see below)
1/4 cup fried shallots (homemade recommended, but store-bought will suffice in a pinch)
2 Tbsp crushed roasted peanuts

Fish Sauce Dressing (nuoc mam cham)
1 clove garlic
1 Thai bird chili
4 Tbsp raw cane sugar
4 Tbsp lime juice or vinegar
4 Tbsp fish sauce
1 cup water

1. Clean the chicken and discard any excess fat. If you wish, you can give the chicken an exfoliating salt scrub to get the skin nice and smooth. :) This step is totally optional, but I love the skin so I make the effort. If you do it, make sure to rinse the salt off afterward. Pat the chicken dry. Next, marinate the entire chicken with 1 teaspoon of salt, both inside the cavity, under the skin, and over the skin. This step is also optional, as the chicken will be eaten with a dressing or sauce in the end anyway, so not a lot of salt is needed here, but I like to have the flavor permeate the meat a little better, so I do like to marinate it for at least an hour and up to overnight. Put the pieces of scallion and ginger in the cavity. If you do let the chicken marinate overnight, take it out of the fridge about an hour before you start cooking to let it come closer to room temperature again.

2. In a stockpot pot large enough to hold the chicken, heat about 2 quarts of water, or just enough water to cover the chicken (but don’t put the chicken in yet). (If you’re not planning to add any extra bones later on, then you’ll want to start out with chicken broth as the poaching liquid here.) When the water boils, slide the chicken gently in. You can have some extra hot water at the ready in case you need to add more to fully submerge the chicken. If you end up with too much water, scoop some out so that the broth doesn’t end up too thin and diluted. You can also add the organs now, if you want to eat those as well. Let the water come back up to boiling, and then cover the pot with a lid. Turn off the stove, and let the chicken poach in the residual heat of the covered pot.

3. After 45-50 minutes, the chicken should be just done. It can take a few trials to get the hang of the timing, and it depends on the size of the chicken. I like my chicken just barely done, with the barest hint of pinkness still left, so for a small bird of around 2 pounds, I would tend to take it out around 40 minutes. And since we’re shredding the chicken in this recipe, there isn’t any pressure to keep the chicken intact or looking nice, so it’s easy just to throw any underdone pieces back into the pot for a little longer. But if you definitely want your chicken to be fully done with no pinkness, then go by the longer time period.

4. A few minutes before taking the chicken out, prepare an ice bath large enough for the chicken to be submerged. Gently lift the chicken out of the stock, drain any juices back into the pot, and plunge the entire chicken into the ice bath. You can turn the chicken a couple times to make sure each part gets covered by the ice water. This step helps to stop the cooking and, most importantly, it firms up the chicken, giving the meat a nice, tight springiness and making the skin crisp.

5. Once the chicken has cooled enough to touch, tear it into pieces with your hands. If there are any bones you don’t plan to eat, take the meat off those parts and toss the bones back into the broth to simmer longer. If you intend to keep all of the bones, then you’ll want to add about a pound of chicken bones into the broth, and let the broth simmer for about another hour. Set the shredded chicken aside as you prepare the salad.

6. To prepare the salad, cut the cabbage into the finest shreds that you can manage. It should feel as light and satisfying as running your fingers through shredded paper packaging. Slice the onion as paper-thin as possible, then soak it for a few minutes in cold water to take some sting out of the raw onion. Drain well. You can give the onion a gentle squeeze to get the excess water out, so that it doesn’t dilute your dressing later on. Set cabbage and onion aside.

7. To make the dressing, pound garlic, chili, and sugar into a paste with a mortar and pestle (the sugar helps create friction as you pound). You can also just mince the garlic and chili with a knife, but I recommend pounding to release all the juices and flavor. Add lime juice or vinegar, and scrape the sides of the mortar to release the paste. Pour all this into a bowl or jar, add the fish sauce and water, and mix. Set aside until ready to serve.

8. Once all the components of the meal have been prepared (including the noodle soup or congee), and just before you’re ready to serve, gently toss together the cabbage, onion, whole coriander leaves, torn cilantro, half of the shredded chicken (reserving the other half of the chicken for the noodle soup or congee), and about 1/3 to 1/2 cup of the fish sauce dressing. Add the dressing incrementally to taste, and adjust as you go along — feel free to be generous here; it’s ok if the dressing ends up pooling at the bottom of the plate. Arrange the salad on a large plate, then top it with fried shallots and crushed roasted peanuts. Serve immediately, while the shallots are still crispy.

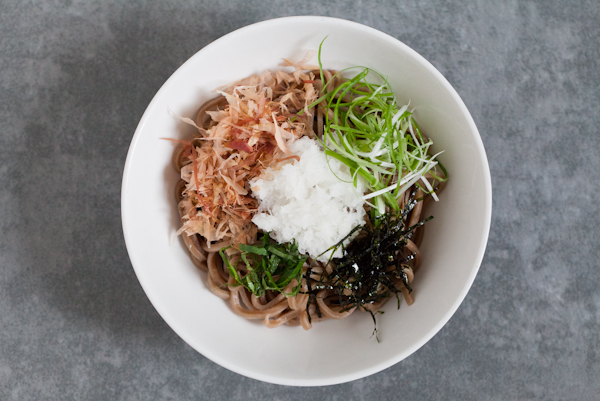
With the approximately 8 cups of chicken broth obtained from poaching the chicken, you can either make chicken congee or chicken glass noodle soup. The recipes below involve using the entire 8 cups of broth — so you could choose to make either recipe as written, or split these recipes in half and make both congee and noodle soup with 4 cups of broth each (as I did in the photos). If you happen to have extra chicken broth on hand, you could make both in their entirety. If you’re looking for ease, congee is essentially made by letting rice boil in broth for about an hour, resulting in a warm, homey bowl of savory rice porridge, with the essence of chicken in every bite. If you want something a bit heartier, then the few extra steps involved in the noodle soup are worth it. 

Chao Ga (Chicken Congee)
Serves 4

2/3 cup jasmine rice (using standard measuring cup, not the plastic cup that comes with the rice cooker)
8 cups chicken broth, strained
1/2 tsp table salt
1/2 poached chicken, torn

For garnish:
2 scallions, thinly sliced
1 bunch cilantro (about 6 stalks), chopped
fried shallots and shallot oil
lime wedges
Thai bird chilies

1. Rinse the rice in water and drain. Repeat 2 more times or until any specks of dirt have been removed and the water runs relatively clear.

2. In a large saucepan or small pot, add the rice, the 8 cups of broth (strained of any stray pieces of chicken or leftover ginger and scallions), and the salt. Let the liquid come to a boil and turn the heat down to low. Keep the liquid at a gentle simmer for about an hour, stirring frequently as the rice gradually absorbs the liquid and the resulting congee grows thicker. How thick or thin you like the congee is a matter of preference. You can add more liquid to thin this out or cook it longer to make it more concentrated. Adjust seasoning at the end, adding more salt (or fish sauce) as needed.

3. Serve the congee in bowls, adding in pieces of the other half of the shredded chicken reserved earlier. Garnish as desired with scallions, cilantro, fried shallots, and shallot oil, and serve with lime and chilies on the side.

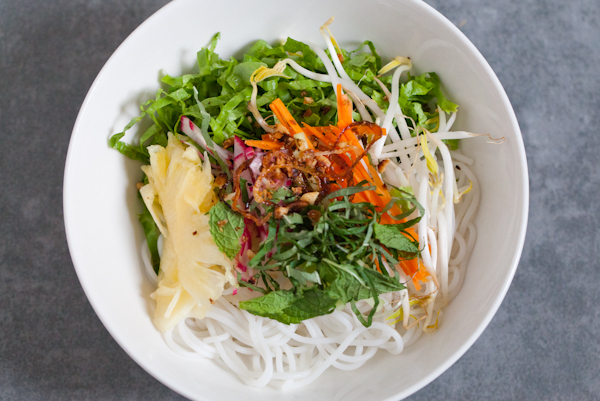
Mien Ga (Chicken Glass Noodle Soup)
Serves 4

If you want to make this even simpler, you can omit the charred onion, ginger, coriander, and lemongrass. You’ll still end up with a flavorful chicken noodle soup that is just as good in its simplicity. Other types of noodles will work with this dish, but you’ll want to boil the noodles in a separate pot of water to avoid the starch clouding up the broth. Only with bean thread (or glass) noodles will it work in your favor to cook directly in the broth, so that the noodles can absorb the flavor.

8 cups chicken broth
1/4 tsp table salt
1 Tbsp fish sauce
half onion, charred
1-inch ginger, charred
1 tsp coriander seed
1 lemongrass, bruised
6 oz. dried bean thread noodles
1/2 poached chicken, torn

For garnish:
2 scallions, thinly sliced
1 bunch cilantro (about 6 stalks), chopped
thinly sliced white onion
fried shallots and shallot oil
lime wedges
Thai bird chilies
Vietnamese coriander

1. Boil the broth with the salt, fish sauce, charred onion and ginger, lemongrass, and coriander (keep the coriander seeds tied in cheesecloth or inside a metal ball for simmering spices for easy removal later; otherwise you’ll have to strain the broth). Simmer together gently for 30-60 minutes. Remove the aromatics and the coriander seeds. Taste the broth and make any adjustments to seasoning accordingly.

2. Soak the bean thread noodles in hot (near boiling) water for 5 minutes. Drain and cook the noodles directly in the broth for 2-3 minutes or until al dente. If desired, you can cook in batches with a mesh strainer. Drain the noodles, allowing the broth to fall back into the pot, and divide the noodles into individual deep soup bowls. Let the noodles sit dry in the bowls until ready to serve. (If you don’t plan on serving right away, then you may need to briefly reheat the noodles in the boiling broth, using a mesh strainer, just before serving to loosen them up.)

3. When ready to serve, heat the broth back up to boiling. Divide the reserved half of the shredded chicken among the bowls of noodles. Garnish the bowls with scallions, cilantro, sliced onion, and fried shallots. Pour hot broth into each bowl of noodles. Drizzle shallot oil over the broth. Serve with wedges of lime and chili pepper on the side.

Ginger Fish Sauce Dipping Sauce
(Not pictured.) Optional dipping sauce for the chicken, to serve alongside the congee and noodle soup.

2 Tbsp grated ginger
1/3 cup fish sauce dressing (from ga xe phay recipe above)

Divide grated ginger onto small dipping plates. Pour fish sauce dressing over the ginger. Serve on the side with the congee and noodle soup for dipping the chicken.

3 Noodle Salads: Vietnamese Bún, Japanese Chilled Soba, Shaanxi Liang Pi

NOODLES3

I mentioned previously that my default lunch during the cooler months of the year is a hot, steaming bowl of noodle soup (see our variations on quick noodle soups here). Similarly, during the warmer months of the year, I default to cold noodle salads. (Well, actually, I eat all of these interchangeably, not always corresponding to outside temperatures. :) Most of the time, what I end up making is a simple Vietnamese vermicelli bowl with whatever I happen to have in the fridge. I like to bulk the bowl up with vegetables, so that there’s at least as much lettuce as noodles, resulting in something that actually is more salad-like.

Lately, I’ve been trying to branch out a bit to try other kinds of noodle salads. From our recent travels to Japan, I wanted to try a cold soba dish. And living in Beijing has also introduced me to one of my favorite Beijing breakfasts, liang pi, or cold noodles (literally “cold skin”) originating from the province of Shaanxi.

Here I wanted to share recipes for these three noodle salads, in hopes that you might have a chance to try one of them before the summer is over. These are all flexible recipes, a springboard for whatever variations you can imagine. Because I usually make noodle salads as a quick lunch, I often don’t bother to add meat or protein unless I have leftovers in the fridge I can toss in. But I’ve made some suggestions below if you wanted to add it. The recipes for both the noodle bowls and the dressings below are for 2 servings, but I actually like to make a large batch of dressing and store it in a mason jar to use throughout the week, so if you intend to do that, please remember to increase the ingredient amounts accordingly. Lastly, I eat these salads more at room temperature, but if you prefer them actually cold, then chill the noodles in a tub of ice water before draining and putting into a bowl. The noodles taste best fresh and tend to harden if refrigerated (like cold rice). But the dressings can be chilled in the refrigerator prior to serving.

Vietnamese Vermicelli Salad Bowl (Bún)
Serves 2

To make this more of a salad, you’ll want to decrease the amount of noodles and increase the amount of vegetables listed. I also like to add some kind of fruit to my vermicelli bowl, for a bit of sweetness, so I’ve included that in the recipe below. Favorites include slices of fresh pineapple, strips of mango, or slices of starfruit. And, of course, you can also top your vermicelli bowl with grilled meat of any kind, like chargrilled pork, lemongrass beef, shrimp, or chicken. Crispy Vietnamese spring rolls also make a good topping. :) But, really, whatever leftovers you have in the fridge (rotisserie chicken perhaps?) will work. Whatever you do, make sure you don’t skip the fried shallots and crushed roasted peanuts on top for that extra bit of smoky flavor.

Noodle Bowl:
5 oz dried vermicelli noodles
2 large lettuce leaves
2-inch piece each of cucumber and carrot, julienned into thin strips
2 radishes, julienned into thin strips
handful Vietnamese herbs (such as mint, Vietnamese coriander, fish mint, etc.)
10 slices of pineapple, starfruit, or mango
handful beansprouts
2 tsp fried shallots (store-bought or homemade)
2 tsp crushed roasted peanuts

Fish Sauce Dressing (nuoc mam cham):
1 garlic
1 Thai bird chili
2 Tbsp raw cane sugar
2 Tbsp lime juice or vinegar
2 Tbsp fish sauce
1/2 cup water

1. Boil a pot of water and add the dried vermicelli noodles. Cook for about 5 minutes or until al dente. Drain and rinse the noodles under cold running water until the water runs clear and all the starch has been washed away. Drain well.

2. To make the dressing, pound garlic, chili, and sugar into a paste with a mortar and pestle (the sugar helps create friction as you pound). You could also just mince the garlic and chili with a knife, but I recommend pounding to release all the juices and flavor. Add lime juice or vinegar, and scrape the sides of the mortar to release the paste. Pour all this into a jar, and add fish sauce and water. This will keep in the fridge for about a week. If you want the sauce to keep longer (up to a month), omit the garlic, chili, and lime juice, and add them just before use.

3. Line the bottom of two bowls with the shredded lettuce. Add the noodles. (If the noodles have started clumping together, you can loosen them in a bowl of cold water, then drain well.) Then top the noodles with the cucumber, carrot, radish, fruit, beansprouts, and herbs. Lastly, sprinkle fried shallots and crushed roasted peanuts on top.

4.  Serve the noodles with the sauce on the side. To eat, drizzle sauce over the bowl and toss lightly.

Japanese Chilled Buckwheat Noodles (Soba)
Adapted from Elizabeth Andoh’s Washoku and Takashi Yagihashi’s Takashi’s Noodles
Serves 2

Individual serving-size katsuobushi flakes are really convenient for this recipe. As a shortcut, you can use store-bought ponzu sauce as the dressing here, but if you have time, I do recommend the homemade ponzu below from Washoku, which is like dashi with soy sauce, sugar, and citrus juice (if you already have dashi on hand, then simply add the soy sauce, sugar, and citrus juice to a jar and shake). For added protein, try a raw quail’s egg (or raw egg yolk), which was part of the original recipe from Takashi’s Noodles.

Noodle Bowl:
6 oz soba (buckwheat noodles)
3-inch piece daikon, peeled and grated to yield about 1/2 cup
1 scallion, cut into 2-inch pieces and thinly sliced lengthwise
2 small (snack-size) sheets of roasted nori, cut into thin slivers with scissors
1 (0.1 oz) individual packet katsuobushi flakes
2 shiso leaves, cut into thin ribbons (chiffonade)

Dressing:
2 Tbsp soy sauce
1 tsp sugar
1/4 cup water
2 square inches kombu
1 (0.1 oz) individual packet katsuobushi flakes
2 Tbsp fresh lemon, lime, or grapefruit juice
1/4 tsp grated lemon zest (optional)

1. Boil a pot of water and add the soba noodles according to the package directions. (If using fresh noodles, cook for about 1 minute. If using dried, cook for 4-5 minutes. In both cases, you want it just al dente.) Rinse the noodles under cold running water until the water runs clear and all the starch has been washed away. Drain well.

2. Divide the noodles among 2 bowls. On top of the noodles, add small mounds of the grated daikon, sliced scallions, shredded nori, and katsuobushi flakes.

3. To make the dressing, combine the soy sauce, sugar, water, and kombu in a small saucepan and bring to a simmer. Remove from heat and add the katsuobushi flakes. Cover the saucepan, and let it stand or 2 minutes. Strain through a fine-meshed sieve into a jar. Add the citrus juice and (if using) lemon zest. Sauce will keep in refrigerator for 1 month.

4. Serve the noodles with the sauce on the side. To eat, drizzle sauce over the bowl and toss lightly.

Shaanxi Sesame Cold Noodles (Liang Pi)
Serves 2

There are different versions of this dish, and this recipe is based off the version I get from a local street vendor just down the street from where I live. (In the interest of full disclosure, I should mention that I got the noodles and wheat gluten from the vendor for the purposes of recreating this here — it was just a lot easier than tracking the ingredients down around town!) There are also different versions of the liang pi noodles themselves, but I find that the versions I eat in Beijing are quite similar to Cantonese ho fun, so that is what I suggest using in this recipe (ho fun is also what our family uses to make Vietnamese banh uot, which I find to be very similar to liang pi!). To make this more salad-like, decrease the amount of noodles and increase the amount of cucumber listed here. That’s actually how our street vendor serves this dish, with equal parts cucumber and noodles.

This dish traditionally involves a baked spongey wheat gluten known as kao fu or bran puff. It is similar in texture to tofu that has been frozen and then defrosted, which takes on a spongey consistency. Fried tofu puffs are also similar, but fried tofu probably doesn’t taste very good cold. Wheat gluten may be sold along with tofu at Asian grocery stores, but if you can’t find it you can substitute frozen-then-defrosted regular tofu or a medium-firm regular tofu.

Noodle Bowl:
12oz fresh wide rice noodles (ho fun – you can these precut as noodles or in sheets you can cut yourself)
7 oz spongey wheat gluten or tofu, cut into bite-size cubes
1/2 English cucumber
1/4 cup bean sprouts
2 Tbsp cilantro leaves

Sesame Dressing:
2 Tbsp sesame paste (or Tahini)
4 Tbsp Chinese black vinegar
2 Tbsp soy sauce
2 tsp sesame oil
2 cloves garlic, minced
dried chili flakes and chili oil, optional

1. Peel the rice noodles (or if you bought rice noodle sheets, cut them into wide noodle strips, then peel). Divide the peeled noodles among two bowls, sprinkle a bit of water over the noodles, and microwave each bowl for about 1 minute or until the noodles are soft and a bit translucent. (You can also steam the rice noodles in a wok or a bamboo steamer if you wish.) Let noodles cool.

2. To make the sesame dressing, combine all the dressing ingredients in a bowl and stir. [Update: Depending on how dense your sesame paste is, if the sauce ends up too thick you can thin it out with a bit of water.]

3. Top each bowl of noodles with the wheat gluten or tofu, julienned cucumber, bean sprouts, and cilantro leaves.

4. Serve the noodles with the sauce on the side. To eat, drizzle sauce over the noodles and toss lightly.

Jjajangmyeon (자장면 or Noodles in Black Bean Sauce)

Jjajangmyeon

I have to confess that I ate my very first bowl of jjajangmyeon (자장면) in Grenada. My Korean friend Terry (remember, she’s the one who likes to make things like tofu, miso, and kimchi from scratch!) invited me over for lunch one day and to my surprise and delight, she presented me with an overflowing bowl of noodles covered in sweet black bean sauce. And of course, there was a side of danmuji (yellow, pickled radish) to go along with it too.

Jjajangmyeon is originally a Chinese noodle dish (zhajiangmian 炸酱面) with regional variations in China. The most widely known is probably the Beijing version, which is made with a salty yellow soybean paste called huangdoujiang or simply huangjiang. In other areas of China, it is also made with doubanjiang (a fermented broad bean sauce common in Sichuan), hoisin sauce, or a sweet bean sauce called tianmianjiang.

When Chinese immigrants first started working in Incheon, Korea, they missed the flavors of home so much that they brought bean paste with them to make Chinese zhajiangmian. The Koreans picked up on this business opportunity quickly and soon began selling their own version of the bean paste, called chunjang, which is made by combining roasted soybean paste with a caramel base. It seems to be most similar to the Chinese tianmianjiang.

jajangmyeon1

I prefer the Korean version of this dish to the Chinese version because I think the sweetness balances out the bitterness of the black beans nicely. To make the Korean version, I use a Korean “Chinese black bean paste” from HMart, with caramel included in its contents. The consistency is a bit more liquid than many other types of bean pastes.

Jjajangmyeon is typically served with wheat noodles, which you can find fresh or dried at Asian grocery stores. If those aren’t available, spaghetti works fine too! The vegetables in this dish can vary based on what’s in season but usually consist of potato cubes, zucchini, and in the Korean version, onions (which add sweetness). In Grenada, I substitute with cabbage because some of the other vegetables are hard to find. Traditionally, pork belly is used because the rendered fat is what is used to “fry” the sauce, but you can also use lean pork and vegetable oil as a healthier alternative. Incidentally, this treatment of the sauce is what gives this dish its name — literally, “fried sauce noodles” in both Korean and Chinese.

Here’s Terry’s basic recipe for jjajangmyeon. The only change I made was to cut the amount of oil in half to make it a bit healthier. I hope you enjoy it as much as I did!

Jjajangmyeon
4 servings

1/2 lb. pork belly (or lean pork)
1/2 cup sweet black bean paste (also known as chunjang in Korean and tianmianjiang in Chinese — look for caramel in the ingredients and a thin consistency)
1/4 c. fat rendered from pork belly and/or vegetable oil
2 1/2 Tbsp. sugar
2 1/2 Tbsp. oyster sauce
1 large potato
1 onion
1/3 head of cabbage (about 1 c. chopped), or substitute zucchini or daikon
2 cup chicken stock
2 Tbsp. corn starch
1/4 cup water
1 16 oz. pack of wheat or spaghetti noodles
cucumber matchsticks for garnish

1. Dice the pork belly, potatoes, onions, and cabbage (or zuchhini or daikon) into 1/2″ cubes.

2. In a large wok, fry the pork belly with 2 Tbsp. of vegetable oil until the pork is cooked and crispy.

3. Separate the pork belly and the fat/oil.

4. Add vegetable oil to the rendered pork fat until you have 1/4 cup. Put back into the wok.

5. Pour the black bean paste into the oil and fry for about 10 minutes, stirring constantly.

6. Meanwhile, start boiling water for your noodles. Prepare according to the package directions. Noodles can be a little softer than al dente for jjajangmyeon. Drain noodles when done and set aside.

7. After about 10 minutes, the sauce should look thinner and smoother. Half of the oil will still be separated from the sauce, but that’s okay. Pour out the sauce and put the excess oil back into the wok.

8. Begin stir-frying the vegetables in the wok with the oil, beginning with the potatoes. Add in the onions and cabbage (or zucchini or daikon) after about 2-3 minutes. Lastly, add in the pork.

9. Pour the fried paste into the vegetable and pork mixture, stir until coated evenly.

10. Add in the chicken stock and bring to a low simmer. Cook for about 10 minutes.

11. After 10 minutes, check to see if the potatoes are cooked. They should be just cooked through and still feel a bit firm.

12. Add in the corn starch, dissolved in water. Stir the sauce until thickened.

13. Season with additional salt and sugar as needed.

14. Serve over bed of noodles. Garnish with cucumber matchsticks. Enjoy!

_MG_8926

_MG_8941

The Story of Budaejjigae, Korea’s “Army Base Stew” (부대찌개)

While preparing for our trip to Seoul in November, I came across an interesting Korean dish called budaejjigae (부대찌개), which translates to “army base stew.” Being a fan of Shin Ramyun, the Korean instant noodles with an almost cult following of Asians around the world, the idea of a spicy stew composed of Korean ramen and a mishmash of crazy toppings, including Spam, instantly appealed to me. I know — that either sounds very right or very wrong to you. Let me get to that in a moment.

Regardless of whether this is a dish you think you might ever want to try, suffice it to say that budaejjigae has a fascinating history. And during my time in Seoul, I was fortunate to meet the lady whom many believe to be the creator of this stew. She’s still making it to this day! You can find out more about her and the origins of budaejjigae in my story in the Washington Post’s travel section today. 

Now, as for whether this dish is worth trying… If you’re a fellow Shin Ramyun devotee, let me just say — one taste of budaejjigae, and you will understand the true meaning of Shin Ramyun. But if you’re balking at the whole idea of paying for a bowl of instant noodles at a restaurant, or asking why you would want to go to Korea to eat Spam — let’s just start over, shall we? This is not a bowl of glorified instant noodles. This is a Korean feast. So: think bubbling Korean stews cooked at the table with fresh ingredients — onions, scallions, gochujang (Korean red pepper paste), kimchi, tofu, leafy greens. Then, yes, add Spam and ramen and whatever else you like — it will all simmer in the rich, spicy broth, soaking in the flavors of the stew. To eat, serve with kimchi and rice. If you truly are not an adventurous eater, I suppose you could substitute in “real” meat (in Korea, Spam is made with real meat!) and maybe some Korean glass noodles. But if you don’t eat kimchi, I can’t help you there.

This is also an easy dish to recreate at home. It’s not quite the same as digging into a big black cauldron of budaejjigae in the dish’s native Uijeongbu, where each chef each has his/her own take on the stew. But it’s a nice, hearty meal that comes together quickly, especially for a cold winter weeknight.

Budaejjigae (Korean Army Base Stew): A Non-Recipe

This can be made quickly in a pot on the stove or cooked in a deep electric skillet or wok at the table, where it continues to simmer while you eat. You can have it as a one-pot meal on its own, or serve it with kimchi and rice.

Sticking to the rustic origins of this dish, here I offer you my non-recipe. Use this as a general guideline. Adjust amounts to your liking. The ingredients to this dish are very flexible, but generally it’s the gochujang, kimchi, Spam, and Korean ramen that make it, so try not to skip those. (Korean ramen has thicker noodles than other instant noodle brands. Don’t use the seasoning packets, though, as the flavor of the stew will come from the other ingredients.) Even if you just tossed everything into a pot and boiled it, it would turn out fine. The only thing I’ll mention is that if it comes out a tad too sour for you, due to the kimchi, try adding a dash of sugar. And you’ll want to eat the noodles as soon as they’re done, to avoid them getting soggy.

BASE: gochujang, kimchi
+
AROMATICS: onion, garlic, scallions
+
MEAT: Spam (additionally, sliced hot dogs and ground beef are also common)
+
BROTH: enough chicken or beef broth (homemade, canned, or even water would work) to just cover all the ingredients; add water if it boils down too quickly
+
VEGETABLES: leafy greens like garland chrysanthemum are popular (I’ve used pea sprouts in the photo), as are various mushrooms like enoki or shiitake
+
NOODLES: Korean ramen, such as Shin Ramyun noodles (skip the seasoning packets, though); some people like to also add sweet potato noodles
+
OPTIONAL TOPPINGS: baked beans, tteok (rice cake), bacon, tofu, and American cheese